Automatic Enrichment Device: Reassembly
1
(a) Fit the new main valve diaphragm with the concave side of the diaphragm toward the valve head.
(b) Insert the main valve assembly into the valve body and refit spring and clips to the main valve stem (see diagram on page 55 for detail of the correct order of assembly of clips).
(c) Refit the air entry flap valve with spring and spindle, ensuring that the legs of the spring are correctly located.
(d) Fit new valve body gasket, ensuring that it does not foul the air entry flap valve.
2
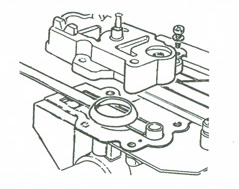
(a) Place a steel rule along the main body to cover the valve seating. Position the diaphragm clamp ring directly over the main valve seat on the steel rule.
(b) Align the valve body carefully over the main body so that the clamp ring engages in the diaphragm recess and fit the two short screws with spring washers.
(c) Lightly tighten the screws and remove the steel rule. It is important to check that the jet needle threaded insert in the valve body is aligned with the jet tube bore before fully tightening the securing screws.
(d) Check the operation of the air entry flap valve ensuring that it is lightly sprung onto its seat.
3
(a) Drop the jet needle into the jet tube and screw the square-headed adjuster screw into the valve body until the dimension in the drawing on page 55 is achieved or to where the jet needle was prior to dismantling. Check the location of the needle in the jet before fitting the needle diaphragm.
(b) Position the top cover gasket.
(c) Refit the main bi-metal with the bi-metal slotted on the main valve stem under the lower clip (see the drawing on page 55) and resting on its 'V' pivot slots.
(d) Fit the top cover noting that there are, in some top covers, internal moulded serrations which hold the jet needle in position and that the spring in the cover locates on the main bi-metal.
(e) Refit the air entry pipe.
4
(a) With the unit inverted, fit the new needle diaphragm assembly as follows: Ensure that the hollow dowel (30) is free from obstruction and fit it to the main body.
(c) Place the diaphragm (27) over the dowel, with the float rivet head downwards, and align it with the screw holes.
(d) Position the spring (28) in the locating place of the diaphragm.
(e) Place the cap (29) over the spring and press down towards the body. Take care to engage with the hollow dowel and to keep screw holes aligned.
(f) Whilst holding the cap down against the pressure of the spring, check that the diaphragm has not puckered around the edges of the screw holes.
(g) Fit the four screws with their spring washers and tighten down evenly.
5
(a) The following procedure must be adhered to when replacing the float chamber lid assembly: Fit a new float chamber lid gasket to the body of the unit.
(b) Using the new components supplied, invert the float chamber lid and drop the float needle into its seating.
(c) Fit the float assembly ensuring that the needle is correctly located on the float by means of its wire stirrup.
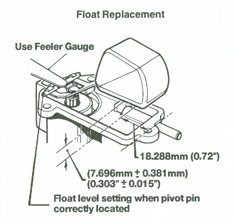
(d) Holding the float assembly to the face of the lid with the tip of a steel rule or feeler gauge (as shown in diagram above) position the lid over the float chamber close enough to allow the float hinge pin to drop into position, when the feeler gauge is removed, without the needle falling from the seating bore or the stirrup becoming disengaged.
(e) Lower the lid the rest of the way onto the main body, align the screw holes, and fit the three screws and spring washers including the specification tag.
(f) Tighten the screws evenly.
(g) Test that the float is free to move in the chamber by rotating the whole unit around the float pin axis and listening for movement of the float.
6
(a) Refit the filter (34) and plug (35) using a new washer (36).
(b) On completion of tuning adjustments fit the aluminium blanking plugs and heat insulation cover.
(c) Refit the unit to the vehicle in accordance with the manufacturer's instructions ensuring that all connections are secure and that all pipe work is leak free.