Automatic Enrichment Device: Dismantling
Note: For unit removal and fitting instructions refer to vehicle manufacturer's literature.

1
(a) Remove the polypropylene heat insulation cover. Then, using a thin-bladed screwdriver, prize out the three aluminium blanking plugs (2) in the top cover.
(b) Holding the unit upright remove the screws (7,8) retaining the bakelite top cover (3) and remove the cover.
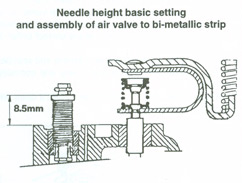
(c) Disengage the main bi-metal from the air valve stem (see diagram above).
(d) Remove the two screws retaining the moulded body (14) and lift off the body.
(e) Dismantle the spring clip assembly from the air valve stem and remove the valve, complete with diaphragm, from the body.
(f) Remove the jet needle (13) from the valve body, noting the number of turns (flats) required for its removal.
(g) Lift the lower body gasket in order to remove the air entry flap valve, together with the spindle and spring.

2
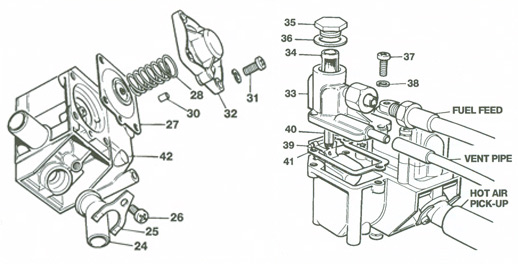
(a) Unscrew the large screwed plug (35) and remove the filter.
(b) Unscrew the three screws (37) retaining the float chamber lid (33) and carefully remove the lid. If it is stuck to the main body, separate by tapping the side of the lid with the handle of a screwdriver.
(c) Remove the float needle (40) and float assembly (39) complete with the hinge pin. The float needle may now be detached from the float by unhooking the wire stirrup.
(d) Remove the float lid gasket (41).
(e) Drain any residual fuel by inverting the unit.
3
(a) With the unit inverted, unscrew the four screws (31) retaining the needle diaphragm cap (29) and hold the cap against the load of the spring (28) inside it whilst withdrawing the screws. If the cap is stuck to the diaphragm, hold the unit firmly then separate by tapping at the side with the handle of a screwdriver.
(b) Remove the cap, spring, diaphragm (27) and hollow locating dowel (30) from the main body (42).
(c) Unscrew the screw (26) retaining the air entry pipe clamp (25) and remove the clamp and the pipe (24).


