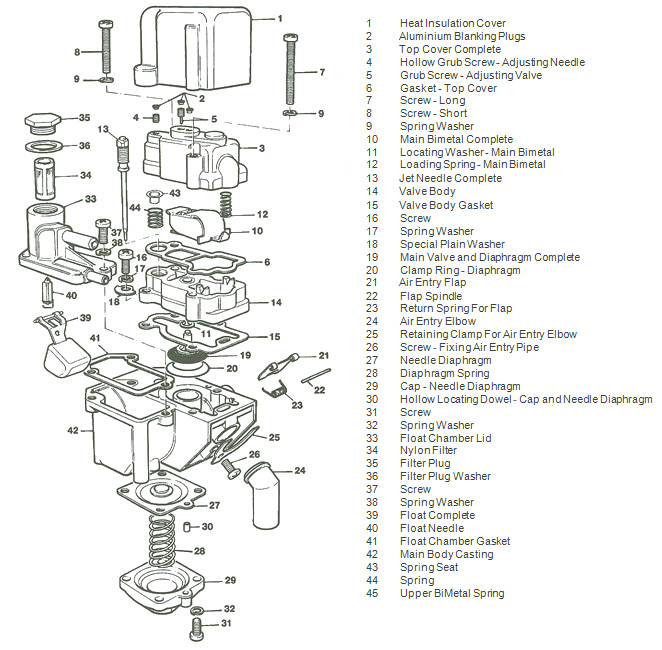
Automatic Enrichment Device: Tuning
The AED unit has been pre-set to give a satisfactory running condition on the majority of engines. However, like the main carburetters, it may require trimming of the mixture and idle speed settings to accommodate the individual fuelling requirements of your engine. This operation must be completed within the first 3 minutes (approx.) of running time, i.e. before any substantial amount of heat reaches the AED to cause significant movement of the bimetals. It may therefore take more than one cold start to achieve the desired results.
Installation
When fitting the new AED it is essential to ensure that the hot air pipe, which runs around the back of the engine to the rear exhaust manifold, is correctly installed, and that the insulation which clads the pipe is complete and undamaged. Ensure that the connection to the hot-spot on the rear exhaust manifold is secure and there are no gaps which might admit cool air.
Priming The AED With Fuel
On early vehicles the AED can be primed with fuel by merely switching on the ignition, which immediately activates the fuel pump. Later vehicles are fitted with an engine oil pressure sensitive inhibitor switch in the electrical circuit of the fuel pump. The engine therefore has to be cranked for several seconds in order to activate the fuel pump and allow it to prime the AED. In either case, wait approximately 20 seconds before attempting to start the engine, to allow the fuel well in the AED to fill.
Checking the Mixture Strength
Start the engine. Initially it should run slightly rich as the fuel well is used up, but after approximately 10 seconds should settle down to more even running. An erratic beat and visible exhaust fumes indicates too rich a mixture. Surging or the inability to run for more than a few seconds culminating in a rapid stall out indicates too weak a mixture.

Mixture Adjustment
(a) Remove the push-on plastic insulating cover (1).
(b) Unscrew and remove the two screws retaining the top cover (7, 8).
(c) Disengage cover from gasket and remove carefully (3).
(d) The mixture is regulated by the square headed brass screw which carries the metering needle (13). Move in increments of not more than 1/8 of a turn (half flat), clockwise to weaken, anti-clockwise to richen.
(e) Carefully replace the top cover ensuring that the gasket is correctly positioned and the C -shaped spigot, moulded on the underside of the top cover, engages with circular recess around the needle adjuster. Press the cover down against the spring load and screw in the two retaining screws. Do not over tighten.
(f) Restart the engine and, if necessary, repeat the procedure using finer increments.
Fast Idle Speed Adjustment
(a) Having established the correct mixture strength the fast idle speed will require minimal adjustment. Ideally this should be approx. 1000 rpm at an ambient temperature of 5-1 O°C.
(b) Remove the centre brass plug in the top cover which exposes the adjust screw (5). Using a narrow blade screwdriver, turn clockwise to reduce rpm arid anti- clockwise to increase rpm.
Needle Lift Adjustment
This is set to .045" at 20°C (measured when static) and should not need to be touched, except perhaps in the case of an engine having low manifold depression, where it may be desirable to reduce this figure to overcome part warm starting problems. Needle lift is temperature sensitive and ideally should reduce to zero at, or just prior to, the moment of closure of the main valve. The adjust screw (4) for this setting is found under the brass plug at the narrow end of the top cover. There is a hole through the centre of it to allow a 1/16" diameter probe to be inserted when measuring the needle lift. Screw clockwise to reduce needle lift, anti-clockwise to increase lift.
Part Warm Starting Problems
The inability of an engine to restart in the part warm condition is almost invariably caused by over-richness.
This can be caused by:
(a) Too much main valve opening, due to either incorrect initial setting or air leaks into the hot air system preventing temperature rise within the unit.
(b) Too much needle lift giving excessive cranking enrichment.
(c) Inability of the engine to generate sufficient manifold depression to pull down the needle diaphragm, due to being excessively worn mechanically or retarded ignition setting


