HS Type Carburetter: Tuning (General)

It is essential, particularly where vehicles are equipped and tuned to comply with engine emission control regulations, that the carburetters are tuned in accordance with the vehicle manufacturer's tuning data. To achieve the best results when tuning, the use of a reliable tachometer, balancing meter and an exhaust gas analyzer (CO meter of the infra-red non-dispersive type or equivalent are required). These instruments are essential when tuning vehicles equipped to conform with exhaust emission regulations.
Before servicing or tuning a carburetter in an endeavour to rectify poor engine performance, make sure that the maladjustment or fault is not from another source by checking the following:
Valve clearance
Spark plug condition
Contact breaker (dwell angle)
Ignition timing and advance
Presence of air leaks into the induction system
1
(a) Remove the air cleaner(s).
(b) Check the throttle for correct operation and signs of sticking.
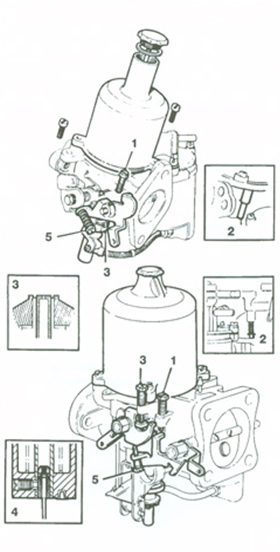
(c) Unscrew the throttle adjusting screw (each screw on multi-carburetters) until it is just clear of the throttle lever with the throttle closed, then turn the screw clockwise 1.5 full turns (single), one turn on each (multi carburetters) (1).
(d) Raise the piston of each carburetter with the lifting pin (2) and check that it falls freely onto the bridge when the pin is released. If the piston shows any tendency to stick, the carburetter must be serviced.
2
(a) Lift and support the piston clear of the bridge so that the jet is visible; if this is not possible due to the installed position of the carburetter, remove the suction chamber assembly.
(b) Turn the jet adjusting nut/screw up/anti-clockwise, until the jet is flush with the bridge or as high as possible without exceeding the bridge height (3). Ensure that the jets on multi-carburetters are in the same relative position to the bridge of their respective carburetters.
(c) Check that the sintered needle guide is flush with the underside face of the piston (4).
(d) Turn the jet adjusting nut/screw (3) two turns down/clockwise (each nut/screw on multi carburetters).
(e) Turn the fast-idle adjusting screw anti-clockwise (each screw multi-carburetters) until it is well clear of the cam (5).
3
Refit the suction chamber assembly if it has been removed and, using the lifting pin (2), check that the piston falls freely onto the bridge. Note: If ball bearing suction chambers are fitted take care not to wind up the piston spring when refitting the suction chamber - see reassembly section.

4
Check the piston damper oil level:
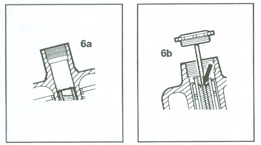
(a) Standard suction chambers. Unscrew the cap and withdraw the damper. Top up with oil (preferably S.A.E.20) until the level is just below the top of the hollow piston rod, refit the damper and screw the cap firmly into the suction chamber (6a).
(b) Ball bearing suction chambers (early type). Unscrew the cap and raise the piston and damper to the top of their travel. Fill the recess in the damper retainer with oil (preferably S.A.E. 20), lower the damper until the cap contacts the suction chamber, repeat this procedure until the oil level is just visible at the bottom of the retainer recess. Screw the cap firmly into the suction chamber. It is essential that the bearing retainer is not displaced from its position in the piston rod (6b).
(c) Ball bearing suction chambers (later type). Unscrew the damper cap and withdraw the damper. Top up with oil (preferably S.A.E. 20) to within 6.5 mm (0.25 in) of the top of the hollow piston rod. Refit the damper and screw in firmly.
5
(a) Vehicles with emission control. Connect a reliable tachometer to the engine in accordance with the instrument manufacturer's instructions.
(b) Start the engine and run it at a fast-idle speed until it attains normal running temperature, then run it for a further five minutes.
(c) Increase the engine speed to 2,500 r.p.m. for 30 seconds.
(d) Vehicles with emission control. Connect an exhaust gas analyser to the engine in accordance with the instrument manufacturer's instructions. Setting can now commence. If the correct setting cannot be obtained within three minutes, increase the engine speed to 2,500 r.p.m. for 30 seconds and then recommence tuning. Repeat this clearing operation at three-minute intervals until tuning is completed.


