Electric Fuel Pump: Inspection
L and HP Types
(a) Clean the pump and inspect for cracks, damaged joint faces and threads. (b) Remove the circlip in the outlet valve cage and examine the inlet and outlet valve discs for wear. Replace if worn. (c) Examine the valve seat in the body and outlet valve cage for damage and corrosion. If it is impossible to remove the corrosion, or if the seat is pitted, the body or cage must be discarded. (d) Clean the filter with a brush, examine for fractures and renew if necessary.
All Other Types
If gum formation has occurred in the fuel used in the pump, the parts in contact with the fuel will have become coated with a substance similar to varnish. This has a strong stale smell and may attack the neoprene diaphragm. Parts so affected may be cleaned by the use of a suitable solvent.
1
Clean the pump and inspect for cracks, damaged joint faces and threads.
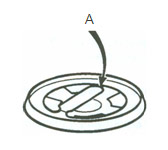
2
(a) Examine the plastic valve assemblies for kinks or damage to the valve plates. They can best be checked by blowing and sucking with the mouth. (b) Check that the narrow tongue A on the valve cage (which is bent over to retain the valve and to prevent it being forced out of position) has not been distorted but allows a valve lift of approximately 1.6mm (1/16").
3
(a) Examine the valve recesses in the body for damage and corrosion; if it is impossible to remove the corrosion, or if the seat is pitted, the body must be discarded. (b) Ensure that the coil housing vent tube is not blocked. (c) Clean the filter with a brush and examine for fractures. Renew if necessary. (d) Examine the coil lead tag for security and the lead insulation for damage
4
(a) Examine the contact breaker points for signs of burning and pitting. If this is evident, the rocker assembly and spring blade must be renewed. (b) Examine the pedestal for cracks or other damage, particularly to the narrow ridge on the edge of the rectangular hole on which the contact blade rests. (c) Examine the non-return vent valve in the end cover (if fitted) for damage. Ensure that the small ball valve is free to move. (d) Examine all diaphragms for signs of deterioration. (e) Renew the following parts: All fibre and cork washers, gaskets and 0 section sealing rings, armature guide plate (if worn), damaged bolts and unions.