H Type Carburetter: Reassembly
Before reassembly all components must be examined for damage and/or wear. Unserviceable components must be renewed.
For replacement of spindle bushes, see "Replacement of Spindles and Spindle Bushes"
1
(a) Check the throttle spindle and its bearings in the carburetter body for wear or scoring. Renew any parts as necessary.
(b) Refit the spindle to the body, ensuring that the fixed operating arm is in its correct position.
(c) Slide the throttle disc into its slot in the spindle until the two securing screws can be entered. Use two new screws.
(d) Manoeuvre the disc until it is a snug fit in the body with the throttle closed. Check the fit visually, and tighten the screws fully. Spread the split ends of the screws just sufficiently to prevent turning.
2
(a) Examine the gland packings for compression and wear. Check the jet for ovality and security of its fork. Renew any parts as necessary.
(b) Reassemble the jet assembly in the reverse order to its dismantling. Ensure that the washer is under the shoulder of the lower jet bearing, that the coned faces of the gland washers face towards the gland packing, and that the copper washer is fitted with its sharp edge towards the upper jet bearing.
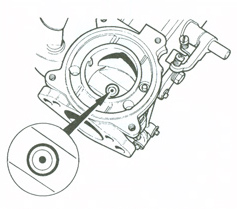
(c) Refit the assembly to the carburetter body but leave the jet locking nut slack.
(d) When the jet is correctly centred (see illustration) it may appear offset from the centre of the jet bearing drilling.
3
(a) Examine the piston assembly for damage to the piston rod and the outside surfaces of the piston. Check the piston key for security in the carburetter body. The piston must be scrupulously clean. Use either petrol or mentholated spirits. Do not use abrasives.
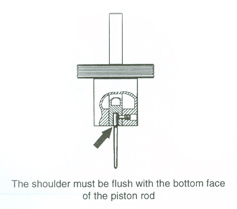
(b) Examine the needle for damage or signs of wear. Refit the needle to the piston. The shoulder should be level with the face of the piston rod (see illustration). Fit and tighten the locking screw. Fit the piston assembly to the suction chamber, invert the complete assembly and spin the piston to check for concentricity of the needle.
(c) Refit the piston assembly to the carburetter body, taking care not to damage the needle.
(d) Replace the washer (when fitted) and piston spring in position over the piston rod.
4
(a) Clean inside the suction chamber and the piston rod guide using petrol or metholated spirit.
(b) Lightly oil the outside of the piston rod, and refit the suction chamber in its original position as marked on dismantling.
(c) Fit and tighten the securing screws.
(d) Centralize the jet (see page 7).
(e) Refit the damper and washer. Do not fill with oil at this stage.
5
(a) Examine the float needle and seating; renew if faulty.
(b) Refit the seating to the float-chamber lid, taking care not to distort or over tighten. Put the needle into the seating, coned end first. Test for leakage with air pressure.
(b) Refit the hinged lever and hinge pin.
(c) Check the float level (see page 8).
6
(a) Examine the float-chamber lid gasket; renew if necessary.
(b) Check the float for damage or puncturing; renew if necessary.
(c) Refit the float to the chamber. Fit the lid and gasket in its original position as marked. Replace the cover cap and nut or cover cap, stay, washer and nut; or drain pipe, washers and nut, as appropriate to the carburetter. Do not over tighten.
(d) Refit the float-chamber assembly to the carburetter body. Ensure that the fibre washers or rubber grommets are in good condition. Check that the washers are in their correct positions. Insert the rubber grommets in the float-chamber banjo and then push the bolt through them (when fitted).
(e) Insert the filter assembly, spring end first, and refit the banjo and bolt together with the fibre washers. Note that the recessed face of the banjo fits toward the hexagon end of the bolt.
7
(a) Refit the return spring plate, return spring and the return spring clip to the throttle spindle. Tension the spring by turning the clip on the spindle and tighten the clip pinch-bolt. Refit the operating lever, and tighten the clamping bolt.
(b) Refit the linkage assembly; use new split pins. Ensure that the distance washer and double-coil spring washer are in their correct positions in relation to the fast-idle cam.